Xin chào, ở bài viết này, trước tiên tôi muốn nói đến vấn đề của mình, Khi phát triển phần mềm Mining Rig Monitor, tôi muốn sử dụng
các tên tiếng Việt để đặt tên cho dàn đào. Ví dụ:
Thanh Long
Bạch Hổ
Huyền Vũ
Chu Tước
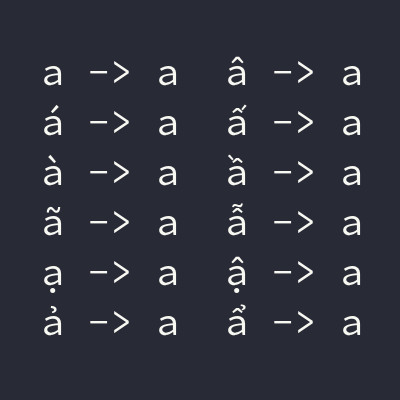
Khi gài vào phần mềm khai thác tiền mã hóa, tôi muốn những cái tên này như sau, dấu gạch ngang tôi sẽ đề cập sau:
Thanh-Long (giữ nguyên)
Bach-Ho (mất dấu nặng dưới chữ a, mũ và dấu hỏi của chữ ổ)
Huyen-Vu (chữ ề thành chữ e, chữ ũ thành chữ u )
Chu-Tuoc (ước thành uoc)
Giải pháp như sau, với function remove_diacritical_marks/1:
defremove_diacritical_marks(string)whenis_binary(string)do# á à ã ạ ả: dấu sắc, huyền, ngã, nặng, hỏilist_1=[769,768,771,803,777]# â, ă, ưlist_2=[770,774,795]string|>String.normalize(:nfd)|>String.to_charlist()|>Enum.filter(fn(e)->Enum.member?(list_1++list_2,e)==falseend)|>Kernel.to_string()end
Còn đây là test case:
defmoduleMiningRigMonitor.UtilityTestdouseExUnit.CasealiasMiningRigMonitor.Utilitytest"remove_diacritical_marks 1"dostring="""
a á à ã ạ ả
â ấ ầ ẫ ậ ẩ
ă ắ ằ ẳ ặ ẳ
e é è ẽ ẹ ẻ
ê ế ề ễ ệ ể
u ú ù ũ ụ ủ
ư ứ ừ ữ ự ử
o ó ò õ ọ ỏ
ơ ớ ờ ỡ ợ ở
"""test_result=Utility.remove_diacritical_marks(string)expected_result="""
a a a a a a
a a a a a a
a a a a a a
e e e e e e
e e e e e e
u u u u u u
u u u u u u
o o o o o o
o o o o o o
"""assert(test_result==expected_result)endtest"remove_diacritical_marks 2"dostring="""
A Á À Ã Ạ Ả
 Ấ Ầ Ẫ Ậ Ẩ
Ă Ắ Ằ Ẳ Ặ Ẳ
E É È Ẽ Ẹ Ẻ
Ê Ế Ề Ễ Ệ Ể
U Ú Ù Ũ Ụ Ủ
Ư Ứ Ừ Ữ Ự Ử
O Ó Ò Õ Ọ Ỏ
Ơ Ớ Ờ Ỡ Ợ Ở
"""test_result=Utility.remove_diacritical_marks(string)expected_result="""
A A A A A A
A A A A A A
A A A A A A
E E E E E E
E E E E E E
U U U U U U
U U U U U U
O O O O O O
O O O O O O
"""assert(test_result==expected_result)endend
Phương pháp của tôi là tách chữ có dấu thành một danh sách chữ + dấu liên quan. (Trong Elixir, module String, nó gọi là Normalization Form Canonical Decomposition - nfd).
Nguyên văn tiếng anh như sau:
:nfd - Normalization Form Canonical Decomposition. Characters are decomposed by canonical equivalence,
and multiple combining characters are arranged in a specific order.
Dưới đây là danh sách thanh sắc, ký hiệu mà tôi mò được.
# á à ã ạ ả: dấu sắc, huyền, ngã, nặng, hỏilist_1=[769,768,771,803,777]# â, ă, ưlist_2=[770,774,795]
Bạn thấy đấy, sau khi có danh sách này, việc cần làm chỉ là dùng Enum.filter/2, nếu mà char nào nằm trong nhóm list_1 & list_2 thì chúng ta loại bỏ.
Kết quả lúc này là 1 charlist []. Để biến nó thành String, tôi dùng String.to_string/1.
Còn về cái dấu gạch ngang -. Tôi sử dụng regular expression |> String.replace(~r([^a-zA-Z0-9]),"-") sau khi đã chạy qua remove_diacritical_marks/1.
Hi vọng tôi đã có thể giúp tiết kiệm 2 phút cuộc đời với cái này!
Xin chào, tôi đã sở hữu chiếc máy in 3D nhãn hiệu K1 Max được gần một năm. Đây là một chiếc máy in tuyệt vời, tuy nhiên tin tôi đi, nếu
bạn không may mắn, chiếc máy này sẽ hành bạn ra trò đấy. Tôi bị nó hành!
Vấn đề 1. Bàn cong vênh và nghiêng (bed mesh)
Nếu bạn chỉ in mỗi cái thuyền - 3DBenchy đi kèm theo máy thì sẽ chả sao đâu. Các vấn đề tôi gặp là khi in với bề mặt sàn lớn.
Nói một cách đơn giản hơn, việc có một lớp nhựa đầu tiên mới diện tích 25cm x 25cm là điều không khả thi. Thực sự tệ hại! Đây chính là vấn đề đầu tiên!
Tôi thực sự ghét điều này! Tôi đã kỳ vọng rất nhiều ở K1 Max!
[1] Nhìn mà xem, chán đời!
Để giải quyết vấn đề này, chúng ta cần hiểu cơ cấu một chút. Có 2 bộ phần:
Bàn gia nhiệt, nó đơn giản là tấm kim loại có dây mai xo bên dưới, tấm này có gắn lớp nam châm để gắn với bàn in. Tấm này bị cong vênh khi gia nhiệt,
thậm chí, độ cong vênh còn thay đổi theo thời gian.
Giá đỡ tấm kim loại mà tôi đề cập bên trên. Cái giá đỡ này khi lắp ráp vào ty ren trục Z, nó được lắp không đều khiến khi bàn bị nghiêng.
[4] Cơ cấu bàn gia nhiệt - heat bed
Cách giải quyết như sau:
Sử dụng bàn kính Glass Bed 310x320x4mm . Thứ này sẽ giúp khắc phục sự cong vênh của bàn gia nhiệt.
Đệm cân bàn silicon giảm chấn - cao bằng nhau 16mm
Bộ lò xo + ốc cân bàn M4. Thứ này kết hợp với đệm silicon giảm chấn giúp khắc phục độ chênh ở ty ren trục Z.
[5] Bàn kính - 310x320x4mm[6] Đệm cân bàn Silicone giảm chấn cho máy In 3D - cao 16mm [7] Bộ lò xo ốc cân bàn M4 núm hoa
Vấn đề 2. Tắc nhựa trong bộ phận kéo nhựa (extruder)
Vấn đề thứ hai là tắc nhựa, Trong quá trình sử dụng bộ phận phun nhựa(extruder) có hiện tượng bị tắc nhựa, nhựa không thể đùn xuống vòi phun được. Anh em trên reddit hay gọi là heat creep, jams, clogs.
Nhiệt năng từ động cơ, truyền vào bánh răng đang kéo nhựa bên trong, hệ quả là chỗ nhựa tiếp xúc với bánh răng kéo nhựa bị mềm ra, sau cùng không đùn nhựa xuống được.
[2] Động cơ kéo nhựa không được làm mát tốt.[3] Bên trong bộ đùn nhựa.
Cách giải quyết:
Mở nắp máy in 3D khi in chất liệu PLA
Giảm dòng điện cấp cho động cơ kéo nhựa, từ 0.55 amp xuống 0.45 amp. file printer.cfg
Lắp lá tản nhiệt để làm mát động cơ
[9] Giảm dòng điện của động cơ.[8] Tản nhiệt cho động cơ
Vấn đề 3. Tắc nhựa trong mũi (nozzle)
Ở thời điểm tôi mua máy, vòi phun của tôi là unicorn nozzle, loại mới nhất của Creality.
Vấn đề này sau khi vấn đề số tắc nhựa trong bộ phần kéo nhựa xảy ra. Có khả năng là nhựa trong đầu phun khi làm nóng quá lâu, biến chất, làm thô bề mặt trong đầu phun nhựa.
Để khắc phục vấn đề này, tôi hiện tại đang dùng đầu phun 0.6mm thay cho mũi bán kèm theo máy là 0.4mm
[10] Vòi phun 0.6mm
Vấn đề 4. Ánh sáng yếu
Vấn đề thứ ba là ánh sáng, hệ thống ánh sáng của K1 Max phục vụ cho cái camera của nó chứ không phục vụ cho người xem trực tiếp. Ánh sáng khá là tối so với nhu cầu của tôi.
This post is all about resolve MSR error while running XMRig on Linux and Window.
Error: FAILED TO APPLY MSR MOD, HASHRATE WILL BE LOW
 * ABOUT        XMRig/6.22.2 gcc/13.2.1 (built for Linux x86-64, 64 bit)
 * LIBS         libuv/1.49.2 OpenSSL/3.0.15 hwloc/2.11.2
 * HUGE PAGES   supported
 * 1GB PAGES    supported
 * CPU          AMD Ryzen 9 7950X3D 16-Core Processor (1) 64-bit AES
                L2:16.0 MB L3:128.0 MB 16C/32T NUMA:1
 * MEMORY       6.8/30.5 GB (22%)
                DIMMA1: <empty>
                DIMMA2: 16 GB DDR5 @ 6000 MHz F5-6000J3038F16G
                DIMMB1: <empty>
                DIMMB2: 16 GB DDR5 @ 6000 MHz F5-6000J3038F16G
 * MOTHERBOARD  Micro-Star International Co., Ltd. - MAG B650 TOMAHAWK WIFI (MS-7D75)
 * DONATE       1%
 * ASSEMBLY     auto:ryzen
 * POOL #1      pool.hashvault.pro:443 coin Monero
 * COMMANDS     hashrate, pause, resume, results, connection
 * HTTP API     0.0.0.0:8080
[2025-04-08 00:19:57.673]  net      use pool pool.hashvault.pro:443 TLSv1.3 157.20.104.252
[2025-04-08 00:19:57.673]  net      fingerprint (SHA-256): "420c7850e09b7c0bdcf748a7da9eb3647daf8515718f36d9ccfdd6b9ff834b14"
[2025-04-08 00:19:57.673]  net      new job from pool.hashvault.pro:443 diff 72000 algo rx/0 height 3384982 (124 tx)
[2025-04-08 00:19:57.673]  cpu      use argon2 implementation AVX-512F
[2025-04-08 00:19:57.673]  msr      cannot set MSR 0xc0011020 to 0x0004400000000000
[2025-04-08 00:19:57.673]  msr      FAILED TO APPLY MSR MOD, HASHRATE WILL BE LOW   <<-------------------- ERROR HERE
[2025-04-08 00:19:57.673]  randomx  init dataset algo rx/0 (32 threads) seed fbd882390916fe90...
[2025-04-08 00:19:57.782]  randomx  allocated 3072 MB (2080+256) huge pages 100% 3/3 +JIT (109 ms)
[2025-04-08 00:19:58.896]  randomx  dataset ready (1114 ms)
For Linux, I test it with Fedora 41.
Run as sudo
Disable Secure Boot in BIOS
Turn off Intel Virtualization Technology, on MSI Motherboard, Bios Click 5 dashboard, its name is SVM (Overlocking >> Advanced CPU Configuration >> SVM mode)
For Window, I did not test, but the concept is the same.
Run as administrator (Window)
Disable Secure Boot in BIOS
Turn off Intel Virtualization Technology in BIOS, on MSI Motherboard, Bios Click 5 dashboard, its name is SVM (Overlocking >> Advanced CPU Configuration >> SVM mode)
Tôi đã lên kế hoạch lắp ráp hệ thống xịt rửa cho sân thượng được một thời gian rồi. Tuy nhiên,
mọi việc cứ trôi đi do bận rộn với dự án quản lý dàn đào tiền mã hóa. Đến hôm nay, 27/3/2025 tôi mới có thể thực hiện được
với sự giúp đỡ của hai người em trai.
Cảm nhận đầu tiền sau khi sử dụng là nước hơi hơi yếu, cơ mà dùng một lúc thì nó cũng quen, bây giờ thì tôi thấy khá là ổn, vừa phải.
Thực ra vệ sinh sân vườn với cái máy bơm tăng áp này là vừa phải, bên cạnh đó nó cũng góp phần tiết kiệm nước. Tôi thích điều này.
Còn gì thích hơn việc mình làm điều mình yêu, và yêu điều mình làm.
Để khoan 2 cái lỗ tròn cho dây nước vào và ra, tôi buộc lòng phải mua mũi khoan tháp của shop MR.DIY. Họ bán một bộ 3 mũi khoan tháp là 175,000 VND. Tính ra, mỗi lỗ khoan, có giá trị là hơn 85,000. Đây là những cái lỗ đắt nhất
mà tôi từng phải khoan.
Lúc đang chưa có việc làm, mấy thứ tốn tiền hay xảy ra!
Trò đời nó hay thế lắm, nhưng tội cái, tôi lại yêu một cái lỗ hoàn hảo.
[2] 3 mũi khoan tháp với giá 175,000
Và còn đây là kết quả, thực sự rất hài lòng.
[3] Thùng điện gắn ngoài trời[4] Vòi nước tăng áp này ổn phết. 7/10 điểm
Đặc biệt là cái máy bơm này nó có cảm biến hay sao ý, khi mà tôi khóa nước ở vòi tăng áp, động cơ nó tự động ngắt. Khá là thú vị. Tôi chắc chắn sẽ tìm hiểu cái này.
Lời kết: Cá nhân tôi, tôi nghĩ rằng sẽ tuyệt hơn nếu mà có hệ thống vệ sinh thụ động, ví dụ là hệ thống nước bao xung quanh sân.
Ấn nút là nó xả nước đẩy sân. Tôi chỉ cần gạt nước đi là xong. Kết thúc câu chuyện.
Và, con đường OVER ENGINEER chả bao giờ kết thúc cả.
Xin chào, khi tôi quyết định viết bài này, tôi buộc lòng phải thừa nhận, tôi không thể nhớ command cũng như các tham số của tar. Bài viết này là dành cho tôi, xem lại sử dụng lệnh tar.
1. Cách tạo lưu trữ (archive) và nén
$ tar-cJvf file_name.tar.xz directory_full_path
Giải thích các tham số:
-c: tạo archive/lưu trữ
-J: nén với định dạng xz, mục đích của nó là giảm dung lượng file lưu trữ. Không có cũng được.
-v: verbose, hiện thông tin chi tíết khi chạy lệnh. Không có cũng được.
-f: tên file file_name.tar.xz
2. Cách mở lưu trữ (extract)
$ tar-xvf file_name.tar.xz
Giải thích các tham số:
-x: extract, mở lưu trữ
-v: verbose, hiện thông tin chi tíết khi chạy lệnh. Không có cũng được.
This guide is all about copy/extract file from docker build process, then copy it to host machine.
This method is very useful when you have to release/package .rpm file for further usage, but in this post,
I will use mkdocs for example, I build mkdocs html files with docker, then copy those html files to host
machine.
I am the owner of a K1 Max 3D printer, the built-in lightning system is not good enought for me. In fact, it’s quite dark.
This project aims at improving the lightning system for K1 Max 3D printer!
I designed the lightning frame myself with Plasticity, due to limited size of K1 Max, I have split the whole big model into 8 parts, then print them one by one.
In addition, there are holes to use LED bars with zip ties, no messy with double-size tapes. You gonna be surprise while cleaning a mess of double-size tapes, and I hate it.
[1] 3D design[2] Light's ON/OFF[3] Finished Product
![[1] Nhìn mà xem, chán đời!](/image/posts/2025-04-09-Cac-van-de-va-cach-khac-phuc-Creality-K1-Max/1.jpg)
![[4] Cơ cấu bàn gia nhiệt - heat bed](/image/posts/2025-04-09-Cac-van-de-va-cach-khac-phuc-Creality-K1-Max/4.jpg)
![[5] Bàn kính - 310x320x4mm](/image/posts/2025-04-09-Cac-van-de-va-cach-khac-phuc-Creality-K1-Max/5.jpg)
![[6] Đệm cân bàn Silicone giảm chấn cho máy In 3D - cao 16mm](/image/posts/2025-04-09-Cac-van-de-va-cach-khac-phuc-Creality-K1-Max/6.jpg)
![[7] Bộ lò xo ốc cân bàn M4 núm hoa](/image/posts/2025-04-09-Cac-van-de-va-cach-khac-phuc-Creality-K1-Max/7.jpg)
![[2] Động cơ kéo nhựa không được làm mát tốt.](/image/posts/2025-04-09-Cac-van-de-va-cach-khac-phuc-Creality-K1-Max/2.jpg)
![[3] Bên trong bộ đùn nhựa.](/image/posts/2025-04-09-Cac-van-de-va-cach-khac-phuc-Creality-K1-Max/3.jpg)
![[9] Giảm dòng điện của động cơ.](/image/posts/2025-04-09-Cac-van-de-va-cach-khac-phuc-Creality-K1-Max/9.jpg)
![[8] Tản nhiệt cho động cơ](/image/posts/2025-04-09-Cac-van-de-va-cach-khac-phuc-Creality-K1-Max/8.jpg)
![[10] Vòi phun 0.6mm](/image/posts/2025-04-09-Cac-van-de-va-cach-khac-phuc-Creality-K1-Max/10.jpg)
![[11] Thêm đèn LED 12V](/image/posts/2025-04-09-Cac-van-de-va-cach-khac-phuc-Creality-K1-Max/11.jpg)
![[1] Lắp ráp thử nghiệm](/image/posts/2025-03-28-Lam-he-thong-xit-rua-cho-san-vuon/1.jpg)
![[2] 3 mũi khoan tháp với giá 175,000](/image/posts/2025-03-28-Lam-he-thong-xit-rua-cho-san-vuon/2.jpeg)
![[3] Thùng điện gắn ngoài trời](/image/posts/2025-03-28-Lam-he-thong-xit-rua-cho-san-vuon/3.jpg)
![[4] Vòi nước tăng áp này ổn phết. 7/10 điểm](/image/posts/2025-03-28-Lam-he-thong-xit-rua-cho-san-vuon/4.jpg)
![[1] 3D design](/image/posts/2025-03-25-A-new-lightning-system-for-K1-Max/1.png)
![[2] Light's ON/OFF](/image/posts/2025-03-25-A-new-lightning-system-for-K1-Max/2.png)
![[3] Finished Product](/image/posts/2025-03-25-A-new-lightning-system-for-K1-Max/3.jpg)
![[4] 3D files](/image/posts/2025-03-25-A-new-lightning-system-for-K1-Max/4.png)