Có những người sinh ra để làm vừa lòng tất cả.
Có những người sinh ra để ẩn mình, đi nhẹ qua đời người khác.
…
Còn Quý Dậu 1993 thì không như vậy.
Bạn sinh ra mang trong mình một thứ khí chất rất khó nhầm lẫn:
Quý Thủy: mềm mại, sâu lắng, lãng mạn, tưởng tượng phong phú, thích làm mát lòng người khác;
Dậu Kim: rõ ràng, mạnh mẽ, trọng danh dự, trọng kỷ luật, không ưa lưng chừng;
Và nạp âm Kiếm Phong Kim: thanh kiếm sắc nhất trong hành Kim, chỉ thật sự thành hình khi đã trải qua lửa đỏ và búa nện rất đau.
Bạn vừa là nước, vừa là trang sức quý giá.
Vừa là sự dịu dàng biết lắng nghe, vừa là đường gươm thẳng đến mức dễ làm người khác và chính mình… bị thương. Chà! 🤨
Bên ngoài, người khác thấy một Quý Dậu năng động, lễ nghĩa, vui vẻ, có trách nhiệm, làm việc ra việc, nói chuyện đâu ra đó, không thích vòng vo, không chịu được sự giả tạo. Bạn dễ được tin cậy, dễ được giao việc, dễ bị gọi tên mỗi khi có rắc rối cần người đứng mũi chịu sào.
Nhưng bên trong, là một Quý Thủy rất sâu lắng: dễ nghĩ nhiều, dễ tổn thương vì gia đình, dễ lo lắng vì những điều người khác xem là nhỏ nhặt. Bạn sống sâu hơn vẻ ngoài của mình rất nhiều, nhưng lại ít khi nói ra, nên không mấy ai hiểu được hết.
Quý Dậu vì thế thường có đường đời không hề phẳng lặng.
Trong sự nghiệp, nhìn chung thì tuổi này hợp những việc cần trí tuệ, kỷ luật, tư duy logic, phân tích; từ tài chính, pháp luật, kiểm toán, nhân sự, quản lý đến kỹ thuật. Bạn có thể bước lên vai trò lãnh đạo nếu đủ kiên định, vì bản chất bạn là người công minh, rõ ràng, biết chịu trách nhiệm.
Trong tình cảm, bạn không dễ mở lòng, nhưng một khi đã chọn, bạn nghiêm túc và hết mình. Thứ bạn cần không phải là một người để “cho vui”, mà là một người đủ sâu để hiểu mình.
Nhưng thanh kiếm này cũng có nhược điểm:
Nếu không đủ kiên trì, bạn dễ “cả thèm chóng chán”, bỏ dở những thứ đáng lẽ làm đến cùng.
Nếu quá cứng, bạn dễ bị hiểu lầm là lạnh lùng, khó gần, khó chịu.
Nếu quá tự lập, bạn dễ kéo mọi chuyện về một mình gánh vác, rồi mệt mà không ai hay.
🔥 Trước khi bước vào năm Bính Ngọ 2026, hãy thử nhìn lại ba năm vừa rồi.
2023 Quý Mão: trong ngoài đều là cạnh tranh, áp lực, so kè. Mão Dậu tương xung, đánh thẳng vào các mối quan hệ và đời sống xã hội. Đây là năm nhiều Quý Dậu phải học bài học về cái tôi: nếu quá sắc, lời nói dễ làm người khác tổn thương; nếu quá thẳng, nhiều mối quan hệ sẽ rơi rụng. Nhưng chính trong sự xung khắc đó, bạn bắt đầu phân loại được đâu là người thật lòng, đâu là “cỏ dại”.
2024 Giáp Thìn: Hỏa khắc Kim, lại thêm việc Quý Thủy phải đi sinh cho Giáp Mộc, bạn như vừa bị đốt, vừa bị hút nước. Năm này không nhẹ nhàng - từ sức khỏe, tinh thần đến tài chính đều có những thử thách riêng. Đổi lại, Thìn Thổ sinh hợp Dậu Kim, vẫn có người giúp, vẫn có cơ hội mở, vẫn có những mối quan hệ đẹp xuất hiện. Nhưng mà tuổi này có cái đặc biệt, là đôi khi nội tâm lại tự cách ly khỏi nhân duyên, duyên tốt tới cũng chẳng chịu nhận lấy. Khổ tâm thiệt chứ!
2025 Ất Tỵ: Hỏa vẫn khắc Kim, ngũ hành vẫn đòi bạn trả bài về sức chịu đựng. Ất Mộc tiếp tục tiết khí Quý Thủy, làm gì cũng tốn thêm sức, thêm lo, thêm suy nghĩ. Tỵ Hỏa vừa là nơi trường sinh của Dậu Kim, vừa là nơi dễ kéo theo thị phi, tranh chấp, lẫn lộn giữa “cơ hội” và “cạm bẫy”. Đây là năm bạn bắt đầu thấy rõ: mình đã vững vàng đến đâu, mình còn yếu ở chỗ nào, mình đang chọn gì vì sợ hãi, và chọn gì vì thật lòng muốn.
🔥 Tất cả những điều đó dẫn bạn đến ngưỡng cửa 2026 Bính Ngọ:
Về mệnh, Kim của bạn phải đi sinh Thủy, mệnh tiết khí: năm của nhiều trăn trở, lo nghĩ, bận rộn, làm không hẳn ít, nhưng để có thành tựu rõ ràng thì phải trả giá bằng sức lực và sự đổi thay nội tâm.
Về can, Quý Thủy khắc Bính Hỏa: về lý, bạn có khả năng kiểm soát phần nào thế cuộc, xoay sở được trong một năm nóng, nhanh, áp lực nhiều. Nhưng Quý là Thủy âm, Bính là Hỏa dương - nước ít mà lửa nhiều, nếu không biết giữ sức, lửa vẫn có thể làm nước bốc hơi.
Về chi, Ngọ Hỏa khắc Dậu Kim, năm đối diện với Kị Thần: áp lực từ người khác, từ tập thể, từ hoàn cảnh bên ngoài. Nhưng Ngọ với Dậu không dữ dằn như Ngọ với Thân. Nghĩa là: bị khắc nhưng không bị “đập nát”, vẫn có chỗ nương nếu bạn biết sử dụng sự linh hoạt, mềm mại của Quý Thủy, thay vì chỉ dùng sự cứng của Dậu Kim.
🔥 Ở tầng Dịch lý, quẻ dành cho Quý Dậu năm 2026 là một bức tranh rất rõ: Trạch Thủy Khốn.
“Quẻ không nói điều chắc chắn sẽ xảy ra.
Quẻ nói điều đang vận động trong tâm bạn.”
Khốn là bị bủa vây bởi hoàn cảnh, trách nhiệm, cảm xúc, kỳ vọng. Thượng Đoài, hạ Khảm: bên trên là miệng cười, vẻ đẹp, sự duyên dáng, sự dễ chịu; bên dưới là nước sâu, là lo toan, là những xoáy ngầm. Người quân tử ở thời Khốn là người vẫn giữ được nụ cười, vẫn làm tròn bổn phận, vẫn không oán thán, dù hoàn cảnh chẳng dễ chịu chút nào.
Với Quý Dậu, Khốn của 2026 giống như một thử thách kép: bên ngoài, bạn phải giữ hình ảnh, giữ vai, giữ trách nhiệm, giữ “chuẩn mực” của mình; bên trong, bạn đối diện với nỗi cô đơn, với cảm giác không ai thật sự hiểu được những gì mình đang gánh.
Hào 2 động là người đang đứng giữa cảnh khốn. Không phải ở trên cao, cũng không ở tận đáy; là người đang bị kẹp giữa nghĩa vụ với người khác và nhu cầu của chính mình. Hào 2 trong Khốn dạy: biết tìm đúng người mà nương, biết chọn đúng điều mà giữ, chịu khó “cô lập” tạm thời để rèn tâm - thì sau này cảnh khốn này sẽ trở thành gốc rễ của khí chất.
Nội Khảm động trong họ Đoài khiến năm 2026 của bạn rất dễ gặp thị phi, hiểu lầm, lời ra tiếng vào. Thêm bản tính thẳng, lạnh lùng, đôi khi bất cần của Dậu, năm 2026 là năm bạn cần đặc biệt cẩn trọng với lời nói, với cách thể hiện cảm xúc. Đôi khi một câu nói “cho xong chuyện” lại là mũi dao cứa vào người mình thương. Đôi khi một cách nói “thật lòng quá” lại làm người đối diện không còn đủ sức ở lại.
Quẻ hỗ Phong Hỏa Gia Nhân nhắc đến chuyện bên trong “nhà”: không chỉ nhà vật lý, mà là gia đình, tổ ấm, nội tâm, những người rất gần bạn. Gia Nhân là đạo chỉnh lại bên trong trước khi nói chuyện bên ngoài. Giữa năm, rất có thể đời sống của bạn xoay nhiều hơn về chuyện gia đình, hôn nhân, con cái, người thân, hoặc bên trong chính mình: học cách quản trị cảm xúc, dọn lại những niềm tin cũ, hàn gắn những vết thương nhỏ nhưng kéo dài nhiều năm.
Quẻ biến Trạch Địa Tụy - tụ lại, hội tụ, gom về, nâng đỡ. Tụy là cảnh mọi người tụ lại lo cho việc lớn, là sự lắng xuống, chín lại sau một thời gian khốn khó. Cuối năm 2026, nếu bạn đi qua được Khốn bằng cách không phản ứng cực đoan, không đập vỡ mọi thứ khi mệt, mà biết nương dựa, biết chia sẻ, biết chọn người để cùng đứng, bạn sẽ bước sang khí Tụy: mối quan hệ ổn hơn, tài chính tụ lại hơn, niềm tin với người và với chính mình sâu sắc hơn.
🔥 Bóng tối (shadow):
Bóng tối của Quý Dậu trong năm nay mang hình bóng của “người bảo vệ kiệt sức” - một archetype thường gặp trong tính cách Kim: khi không biết cách dựa vào ai, người bảo vệ bắt đầu bảo vệ cả những người không cần, bảo vệ cả những thứ không thuộc trách nhiệm của mình, rồi tự trách mình vì không làm tròn mọi thứ.
Năm 2026 của Quý Dậu là thời điểm bạn phải học cách:
nhìn vào phần yếu mềm của mình mà không chê trách nó,
chạm vào nỗi sợ bên trong mà không hoảng loạn,
cho phép mình mềm yếu mà không cảm thấy xấu hổ.
Chỉ khi bạn dám đặt thanh kiếm xuống một chút, bạn mới thấy:
phần bóng tối ấy, thật ra… chính là nơi chứa nhiều ánh sáng chưa khai mở nhất của bạn!
🔥 Nếu bạn cảm thấy mình đang ngày càng khó tin tưởng ai, hãy nhìn lại xem bạn có đang đòi hỏi ở người khác thứ mà chính bạn cũng chưa từng cho bản thân: cơ hội được sai, được yếu, được mệt.
Nếu bạn cảm thấy mọi thứ đều đang “khó hơn bình thường”, hãy nhớ rằng cuộc đời đâu chỉ có giai đoạn thuận. Mùa thu vàng của Dậu phải đi qua mùa gặt - mà gặt thì luôn mỏi.
Nếu những tháng đầu năm và mùa Hè khiến bạn thấy luẩn quẩn, làm nhiều mà việc chậm, xin đừng vội nghĩ “mình vô dụng”. Quẻ Khốn đang dạy bạn bài học của sự kiên nhẫn, của “làm đúng” trước khi “làm nhanh”.
🔥 Tài vận năm 2026 với Quý Dậu.
Đầu năm và giữa năm, tiền dễ vào dễ ra, dễ tốn vì gia đình, vì người thân, vì những việc không lường trước.
Cuối năm, Tụy mở: cơ hội đầu tư, nhất là với đất cát, tích lũy lâu dài, có thể hiện ra cho những ai đã giữ được mình trong suốt giai đoạn khốn khó trước đó. Nhưng dẫu là cơ hội, quẻ vẫn dặn: kiểm soát lòng tham, tránh bị lừa vì quá tin, hoặc vì muốn “đổi đời nhanh”.
🔥 Quý Dậu là nữ, năm này điều quan trọng nhất là: “Hãy sống vì bản thân hơn một chút.”
Đừng yêu đến mức gánh hết mọi phần nặng về mình, rồi nhận phần thiệt như chuyện hiển nhiên. Người khác không đọc được trái tim bạn sâu đến thế đâu. (điều quan trọng đọc lại 3 lần cho tôi!)
🔥 Quý Dậu là nam, hãy học cách quản lý tiền bạc và cảm xúc.
Đừng xả stress bằng cách tiêu tiền bốc đồng. Đừng chứng minh bản lĩnh bằng vài lần “vung tay” rồi lại lặng lẽ lo âu một mình nhé!
“Khốn cảnh không làm khó bạn. Nó chỉ hỏi bạn: giữa tất cả những được mất này, bạn còn giữ được trái tim của mình hay không.”
Bạn thân mến,
Những gì tôi viết phản ánh khí vận chung của người tuổi Quý Dậu trong năm Bính Ngọ này. Số phận riêng của từng người chắc chắn sẽ có những khác biệt - bạn có thể khám phá thêm qua việc xem quẻ Kinh Dịch cho năm 2026 (nếu bạn cần có thể nh-ắ-n tôi)🙏
Nếu trong những dòng chữ này, bạn thấy bóng mình thấp thoáng đâu đó, bạn có thể gửi bài viết này cho những người bạn cùng tuổi Quý Dậu - để họ cũng bước vào năm Bính Ngọ 2026 với một chút chuẩn bị, một chút bình tâm, và một chút dịu dàng hơn với chính mình.
Bài viết này tập trung giải quyết một vấn đề duy nhất: Làm sao để máy tính trong mạng LAN có thể ping máy tính trong mạng VPN. Cụ thể ở đây, trên sơ đồ chúng ta có:
1 Wireguard VPN server wg-easy đang được cài đặt ở máy tính PC 1 - IP 192.168.1.2.
2 VPN client PC 3, PC 4 kết nối từ xa đến Wireguard VPN server
PC 3, PC 4 hoàn toàn có thể ping đến PC 2 - IP 192.168.1.3 (ping 192.168.1.3)
Nhưng PC 2 IP 192.168.1.3 lại KHÔNG THỂ PINGPC 3, PC 4
Bước 1: Thiết lập Wireguard Server wg-easy với thiết lập mặc định
Cài đặt wg-easy sẽ sử dụng docker, docker-compose. Bài viết này sẽ bỏ qua cách cài đặt docker, docker-compose. Trước tiên, hay lấy file docker-compose.yaml mẫu từ github repo của wg-easy
Bước 2: Vào Router, thiết lập port forwarding cho cổng 51820 cho nó trỏ vào đúng LAN IP có Wireguard VPN Server
51821: port này dành cho dashboard quản trị VPN Client. Hoàn toàn không nên làm port forwarding
51820: port này dành cho vpn tunnel, tín hiệu giao liên là ở port này.
Bước 3: Test thử xem VPN Client có kết nối được không
Có thể test IP xem có trùng với WAN_IP của VPN server hay không với command sau.
$ curl https://api.ipify.org
Khi bạn làm đến bước này:
Đã hoàn toàn có thể từ VPN Client 10.8.0.2ping đến LAN IP ví dụ: 192.168.1.[2, 3, 4 ...]
Tuy nhiên, từ LAN IP 192.168.1.[2, 3, 4 ...]không thể ping đến VPN Client 10.8.0.[2, 3 ...]
Thậm chí máy có LAN IP là 192.168.1.2 là máy cài đặt wireguard vpn server, nó cũng không biết đường mà ping đến 10.8.0.2, 3...
Bước 4: Vào Router ví dụ 192.168.1.1, route 10.8.0.0/24 vào 192.168.1.2
Sau khi làm bước này, Khi LAN IP ví dụ 192.168.1.[2, 3, 4...] muốn ping 10.8.0.X, nó hỏi router, router sẽ bảo nó đến gặp 192.168.1.2 (Cái máy có cài Wireguard VPN Server)
[2] Route 10.8.0.0/24 đến 192.168.1.2
Bước 5: Chuyển đổi network_mode: host trong docker-compose.yaml
Tùy theo phiên bản, nó có thể khác. Nhưng sẽ trông giống như sau:
volumes:
  etc_wireguard:

services:
  wg-easy:
    #environment:
    #  Optional:
    #  - PORT=51821
    #  - HOST=0.0.0.0
    #  - INSECURE=false                           # Cái này là về https khi tương tác với wireguard-easy dashboard

    image: ghcr.io/wg-easy/wg-easy:15
    container_name: wg-easy
    networks:                                     # Cụm config network sẽ bị vô hiệu hóa
      wg:                                         # để sử dụng network_mode: host
        ipv4_address: 10.42.42.42                 #
        ipv6_address: fdcc:ad94:bacf:61a3::2a     #
    volumes:
      - etc_wireguard:/etc/wireguard
      - /lib/modules:/lib/modules:ro
    ports:                                        # Cụm config ports sẽ bị vô hiệu hóa
      - "51820:51820/udp"                         # để sử dụng network_mode: host
      - "51821:51821/tcp"                         #
    restart: unless-stopped
    cap_add:
      - NET_ADMIN
      - SYS_MODULE
      # - NET_RAW # ⚠️ Uncomment if using Podman
    sysctls:                                       # Cụm config sysctls sẽ bị vô hiệu hóa
      - net.ipv4.ip_forward=1                      # Sử dụng sysctl trực tiếp từ host
      - net.ipv4.conf.all.src_valid_mark=1         # Hãy lưu lại những config này, nó cần thiết
      - net.ipv6.conf.all.disable_ipv6=0           # Sẽ sử dụng sau.
      - net.ipv6.conf.all.forwarding=1             #
      - net.ipv6.conf.default.forwarding=1         #

networks:
  wg:
    driver: bridge
    enable_ipv6: true
    ipam:
      driver: default
      config:
        - subnet: 10.42.42.0/24
        - subnet: fdcc:ad94:bacf:61a3::/64
Bước 7: Sử dụng firewall-cmd và --add-masquerade để ngụy trang gốc IP/SRC trong data packet
Điều đầu tiên cần làm là kiểm tra xem OS có sử dụng firewalld hay không. firewalld được sử dụng mặc định trên Fedora, OS mà tôi đang sử dụng. Còn nếu không, bạn sẽ phải dùng iptables
$ systemctl status firewalld.service

● firewalld.service - firewalld - dynamic firewall daemon
     Loaded: loaded (/usr/lib/systemd/system/firewalld.service; enabled; preset: enabled)
    Drop-In: /usr/lib/systemd/system/service.d
             └─10-timeout-abort.conf
     Active: active (running) since Tue 2026-01-06 15:05:30 +07; 23h ago
Ngày 2/1/2026, thực sự rất khó chịu với tốc độ này, tôi quyết định dừng lại, không sử dụng monero-blockchain-export nữa, thay vào đó
tôi sẽ sử dụng tar để tạo lưu trữ trực tiếp. Anh em biết gì không, nó vẫn chậm. cực kỳ chậm!
Sau khi tôi được tư vấn với ChatGPT thì là vì vấn đề phân mảnh (fragment) trên ổ đĩa có filesystem btrfs. Nói thêm một chút,
Cơ chế copy/modify file của btrfs là copy-on-write.
Cơ chế update database của LMDB có tính ngẫu nhiên.
Ví dụ, có 10 logical block, khi update lmdb, có thể xảy ra ở ngẫu nhiên các block. Khi các block có update, cơ chế copy-on-write sẽ sử dụng physical block mới.
Việc này làm cho data trên ổ đĩa không liền mạch, phân mảnh.
Sau 1000 lần update như vậy, bạn có thể tưởng tượng sự rời rạc của dữ liệu ban đầu. Thay vì đầu đọc của ổ HDD có thể đọc tuần tự, giờ đây, nó sẽ phải nhảy
liên tục.
1. Vậy tôi nên làm gì?
Giải phân mảnh file /mnt/disk_2/CryptoCurrency/Monero/lmdb - filefrag
$ date +'%d/%m/%Y %H:%M:%S';\
./monero-blockchain-export --data-dir=/mnt/disk_2/CryptoCurrency/Monero --output-file /mnt/disk_2/CryptoCurrency/Monero/monero-blockchain.dump
date +'%d/%m/%Y %H:%M:%S'
09/01/2026 21:01:26
... ... ... ... ...
11/1/2025 23:56:26 Hơn 2 ngày rồi vẫn chưa xong. Tôi sẽ hủy bỏ việc sử dụng monero-blockchain-export, cái này hoàn toàn không đáp ứng nhu cầu của tôi.
4. Kết luận
Backup sử dụng tar là nhanh nhất, đẹp, gọn gàng, đặc biệt là khi sử dụng ổ HDD như tôi.
-loglevel quiet: Không xuất log, xóa cái này nếu cần debug.
Phần thú vị nhất ở đây là video filter, ở command trên dùng 2 filters/bộ lọc:
Crop/Cắt gọt hình ảnh
Scale/Thu nhỏ hình ảnh
3.1 Crop/Cắt gọt hình ảnh
Crop nhận 4 tham số thứ tự như sau: chiều rộng kỳ vọng, chiều dài kỳ vọng, điểm x bắt đầu, điểm y bắt đầu
Bên cạnh đó, ffmpeg con cho phép sử dụng function min/max với tham số in_w/in_h.
min(in_w,in_h): Lấy giá trị nhỏ nhất trong 2 giá trị chiều rộng và chiều cao. Lưu ý, thumbnail hình vuông, nên
chiều rộng và dài kỳ vọng chính là cạnh nhỏ nhất.
(in_w-min(in_w,in_h))/2: Điểm x bắt đầu, chúng ta chia 2 vì muốn căn ngay giữa.
(in_h-min(in_w,in_h))/2: Điểm y bắt đầu, chúng ta chia 2 vì muốn căn ngay giữa.
[3] Sơ đồ
3.2 Scale/Thu nhỏ hình ảnh
Scale nhận 2 tham số chiều rộng kỳ vọng, chiều dài kỳ vọng. Trong trường hợp này, ta muốn thumbnail kích cỡ là 250x250px.
Lưu file tại: .local/share/nautilus/scripts/03-ffmpeg-create-thumbnail-500px-for-files.zsh. Để sử dụng, mở File Explorer - Nautilus chọn một hoặc
nhiều ảnh cần tạo thumbnail, chọn Scripts, chọn 03-ffmpeg-create-thumbnail-500px-for-files.zsh.
ffmpeg(1) - Linux man page, https://linux.die.net/man/1/ffmpeg
6. Lời cảm ơn
Cảm ơn chatgpt đã hỗ trợ tôi hiểu thêm về ffmpeg. Thực sự ffmpeg nó là một bộ công cụ không hề đơn giảnm Không có
chatgpt tôi thậm chí không biết là ffmpeg có hỗ trợ in_w, in_h, với function min/max, Việc tạo ra thumbnail
đã có thể phức tạp hơn rất rất là nhiều.
Cách đây vài hôm, tôi đã tìm hiểu về bitcoin và việc làm dụng ô nhớ trên các giao dịch (tx). Tôi đã selfhost bitcoin
knots với các quy tắc khó chịu như:
từ chối giao dịch có OP_RETURN
từ chối giao dịch lạm dụng ô nhớ witness Taproot
Ở bài viết này, nó sẽ là hành trình tôi tự compile cpuminer - https://github.com/pooler/cpuminer
và đào solo bitcoin. Điều này nghĩa là tôi sẽ kết nối máy tính của tôi vào pool trực tiếp, nếu tôi đào được block. Block của tôi sẽ là
siêu sạch sẽ.
--url: đây là địa chỉ mà minerd sẽ call API, chỉ đơn giản là IP:PORT, mặc định là port 8332 nếu bạn không đổi gì ở file bitcoin.conf
khi triển khai node bitcoin.
--user và --pass: hai cái này là giá trị của --rpcuser và rpcpass trong file bitcoin.conf (mặc định là không có, cần thay đổi và
khởi động lại bitcoin node)
--coinbase-addr: địa chỉ ví, khi đào được block, bitcoin sẽ vào đây.
coinbase-sig: gài coinbase signature để thiên hạ còn biết nếu tôi đào được 1 block nào đó.
threads: số threads muốn sử dụng để khai thác. Xem tối đa với command nproc
Ngoài ra, có các flag quan trọng sau:
-q: quite, yên lặng, không hiển thị báo hashrate trên terminal.
-P hay --protocol-dump: Xem data lúc call API đến bitcoin node.
Bitcoin Knots cho phép người vận hành node (như tôi) từ chối broadcast các giao dịch lạm dụng đến các node khác.
Tuy nhiên, nó sẽ vẫn cho phép các Block được xác thực từ miner, kể cả khi Block đó có các giao dịch lạm dụng, miễn là Block tuân theo cơ chế đồng thuận.
Bằng việc tôi hosting Bitcoin Knots, nó như là một phiếu bầu của tôi cho việc phản đối các giao dịch có tính lạm dung trên mạng lưới.
Nó không làm được gì?
Kể cả Block có toàn là giao dịch lạm dụng, miễn là thỏa mãn cơ chế đồng thuận. Tôi vẫn phải chấp nhận Block này.
Hướng dẫn đầy đủ có sẵn trong source code rồi. Hãy xem ở đây nhé (./bitcoin_knots/doc/build-unix.md) hoặc UNIX BUILD NOTES. Còn dưới này chỉ là bản tóm gọm nhất thôi.
Lúc trước, giai đoạn build sẽ dùng ./configure rồi chèn tham số trước khi chạy cmake, tuy nhiên ở phiên bản mới, không cần dùng đến ./configure nữa.
3. Cách sử dụng bitcoind
Mặc định phiên bản bitcoind được tạo ra từ mã nguồn Bitcoin Knots đã gài các tham số mặc định nhằm loại bỏ không
broadcast các tx lạm dụng rồi. Tôi chỉ đơn giản là thay thế file bitcoind khi chạy node mà thôi. Bên node của tôi chạy, tôi còn thêm datacarrier=0 nhằm
loại bỏ giao dịch có OP_RETURN, Bạn có thể giữ OP_RETURN kết hợp với giới hạn ô nhớ nhằm loại bỏ tx lạm dụng, tôi thì tắt luôn.
Để tiện tham khao, đây là file bitcoin.conf mặc định, bạn có thể xem nó ở bitcoin_knots/share/examples/bitcoin.conf. Trong nhiều flag thì đây là cái quan trọng
rejectparasites: Refuse to relay or mine parasitic overlay protocols
Bên cạnh đó, bạn có thể vào Bitcoin Config Editor để tham khảo thêm, nó cung cấp giao diện dễ sử dụng nên rất tiện.
Web server is behind nginx as a reverse proxy, cannot call curl or wget directly to IP.
Due to ISP blacklist, even though DNS does return IP list ex: nslookup example.com 1.1.1.1 (query IP for domain name
example.com using dns server 1.1.1.1), however, web browser cannot access it.
Don’t want to fetch http body, just header ONLY.
II. Solution
Create a file named test-https-ip.zsh (I use z-shell zsh). After creating this file, please do chmod +x and source it before use.
Trước khi bắt đầu, tôi muốn giới thiệu html5-qrcode. Đây là một repo siêu tốt giúp chúng ta
scan QR Code. Trong bài post này, tôi sẽ hướng dẫn cách tích hợp html5-qrcode vào Phoenix Web Framework & Liveview.
Cảm ơn chatGPT đã giúp tôi hiểu thêm về LiveView, Hook, JS module, tôi chủ yếu là làm về backend, JS hay frontend chưa bao giờ
là thế mạnh của tôi. Thời điểm cuối cùng tôi làm việc nhiều với Javascript, JQuery vẫn là thứ gì đó rất phổ biển, không như bây giờ, Javascript được
sử dụng chung với một Frontend Web Framework ví dụ như Angular, React hay VueJS.
Bài post này sẽ định hướng như sau:
Cách cài đặt html5-qrcode.
Cách tích hợp html5-qrcode vào từng page mà chúng ta cần.
1. Cài đặt html5-qrcode
Hiện tại là 22/9/2025, phiên bản html5-qrcode gần đây nhất là 2.3.8. Bạn vào link
này và download html5-qrcode.min.js
Sau khi download xong, hãy copy vào priv/static/assets/vendor/ trong Phoenix Project.
Trước khi đi xa hơn, tôi muốn chú thích một chút:
Ngay sau khi web browser load file html5-qrcode.min.js, nội dung liên quan sẽ nằm trong variable window.Html5Qrcode, thực chất
nó là một function.
html5-qrcode sử dụng theo cách này, hoàn toàn không liên quan đến npm, thuần túy hết như jQuery. Mọi thứ cần thiết đã ở trong
html5-qrcode.min.js. Tôi chỉ cần load lên và chạy.
Quay lại bước cài đặt, sau khi chúng ta copy xong, bây giờ sẽ cần phải chèn vào file root_layout root.html.heex
Để kiểm tra, bạn có thể vào console và gõ thử window.Html5Qrcode hay Html5Qrcode
2. Tích hợp vào từng LiveView page
Cái này chủ yếu sẽ là làm việc với file html.heex và liveview hook (xem chi tiết).
Định nghĩa một chút về hook (cái móc), khi có sự kiện gì đó xảy ra, một hoặc nhiều hook có liên quan sẽ bị kích hoạt.
Cụ thể hơn, sự kiện tôi muốn sử dụng ở đây là khi LiveView được mounted, thì tôi sẽ chuẩn bị Html5Qrcode và những thứ liên quan. Cái
chỗ này, nó giống với việc trong một page html, ở bên dưới bạn sử dụng <script>.
Bên cạnh đó, về phía giao diện chúng ta sẽ có:
Có field input type=text chứa giá trị qr code.
Có nút ấn để mở ra giao diện quét QR Code
Khi quét ra giá trị của QR Code, cập nhật giá trị cho field input của qr_code. Sau đó đóng giao diện quét QR Code.
2.1 Tạo module Hooks
Trong bài post này, tôi lấy ví dụ là tôi muốn sử dụng html5-qrcode cho page tạo mới sản phẩm cho sàn thương mại điện tử. Tôi đặt tên nó là product_new
Trong assets/js tạo thư mục mới tên là hooks/product_new,
assets
|--js
|----hooks
|------product_new
Trong assets/js/hooks/product_new, tạo file: qr_code_scanner.js với nội dung như sau:
Bạn chú ý nhất là cái function mounted(), nó được kích hoạt khi mà LiveView mount xong cái <tag> chứa phx-hook. Có rất nhiều các hooks, xem chi tiết ở đây Client hooks via phx-hook
Tiếp theo, tạo file mới assets/js/hooks/index.js có nội dung như sau
Sau đó, trong file assets/js/app.js, ta cần thay đổi nội dung như sau để khi khởi tạo LiveSocket, nó sẽ có thêm thông tin về hooks
File:assets/js/app.jsimport"phoenix_html"// Establish Phoenix Socket and LiveView configuration.import{Socket}from"phoenix"import{LiveSocket}from"phoenix_live_view"importHooksfrom"./hooks"// <------- THIS LINEconstcsrfToken=document.querySelector("meta[name='csrf-token']").getAttribute("content")constliveSocket=newLiveSocket("/live",Socket,{longPollFallbackMs:2500,params:{_csrf_token:csrfToken},hooks:Hooks// <------- THIS LINE})
Tóm tắt lại nhé, nãy giờ chúng ta đã làm là lên kịch bản cho hành động sẽ xảy ra khi hook được kích hoạt.
2.2 Kích hoạt Hook
Bây giờ, chúng ta sẽ đến phần kích hoạt hook! Cách kích hoạt hook 100% dựa vào phx-hook(link). Dưới đây là ví dụ:
[1] đây là <input>, khi mà quét QR Code thành công, giá trị của qr code sẽ hiển thị ở đây. Nó liên quan mật thiết đến đoạn code sau
File:assets/js/hooks/product_new/qr_code_scanner.jsfunctionqrCodeSuccessFunction(decodedText,result){qrCodeInput=document.querySelector("#product_qr_code");// #product_qr_code chính là `id` của <input>qrCodeInput.value=decodedText;isOpen=false;scanner.stop().then(()=>{scanner.clear();});}
[2] phx-hook="ProductNewQRCodeScanner" nó liên quan đến assets/js/hooks/index.js. Sai hook name sẽ không thể chạy.
Bên cạnh đó, cái <button> chứa phx-hook được truyền vào bên trong JS class ProductNewQRCodeScanner dưới tên this.el.
Phàn nàn một chút, tôi siêu ghét this. Fuck this shit!
Ma thuật đen đáng căm ghét này là một trong nhiều lý do tôi ko ưng Javascript, Mà lại dành nhiều tình yêu cho Elixir.
Tuy nhiên, tôi tôn trọng nó, đầy là một phần đầy tính di sản của object oriented.
[3] id="qr-reader" đoạn code này liên quan đến chỗ hiển thị màn hình QR Code Scanner. Nó liên quan đến đoạn code sau
Bài viết này là repost vì thông tin này quá đỗi quan trọng với tôi, một người đang bị đau lưng và nghỉ việc vì đau lưng. Cảm ơn chân thành đến:
Giáo sư, bác sĩ Mc Kenzie
CN. Nguyễn Thị Sâm
CN. Trần Thị Giai
CN. Phạm Văn Khôi.
I. Lời mở đầu
Các bài tập McKenzie được hình thành khi Robin McKenzie nhận thấy một số bệnh nhân của ông giảm đau rõ rệt khi được đặt
trong tư thế duỗi lưng (Mc Kenzie, 1981).
Mục đích:
Mục đích của bài tập McKenzie là trung tâm hóa (centralization) vị trí đau ở vùng lưng. Nếu bệnh nhân đau từ thắt lưng,
lan đến mông, đùi sau và bắp chân phải, thì mục tiêu là làm cho vị trí đau khu trú đến trung tâm, ban đầu là lưng, mông,
đùi sau… và cuối cùng chỉ còn lại đau khu trú ở vùng thắt lưng.
Đối tượng: Chương trình tập McKenzie chủ yếu dụa trên các tư thế duỗi nhằm mục đích giảm đau cấp tính và điều chỉnh
tình trạng thoát vị đĩa đệm, dự phòng tái phát ở các bệnh nhân thoát vị địa trung tâm hoặc sau-bên.
II. Các bài tập
Bài tập 1: Nằm sấp thư giãn
Người bệnh nằm sấp, hai tay đặt dọc thân mình, đầu quay sang một bên, hít thở sâu vài lần sau đó nằm thư giãn, duy trì
tư thế này trong 5 đến 10 phút.
Hình 1. Nằm sấp thư giãn
Thực hiện 3-6 lần trong ngày, cũng có thể nằm tư thế này khi nghỉ ngơi.
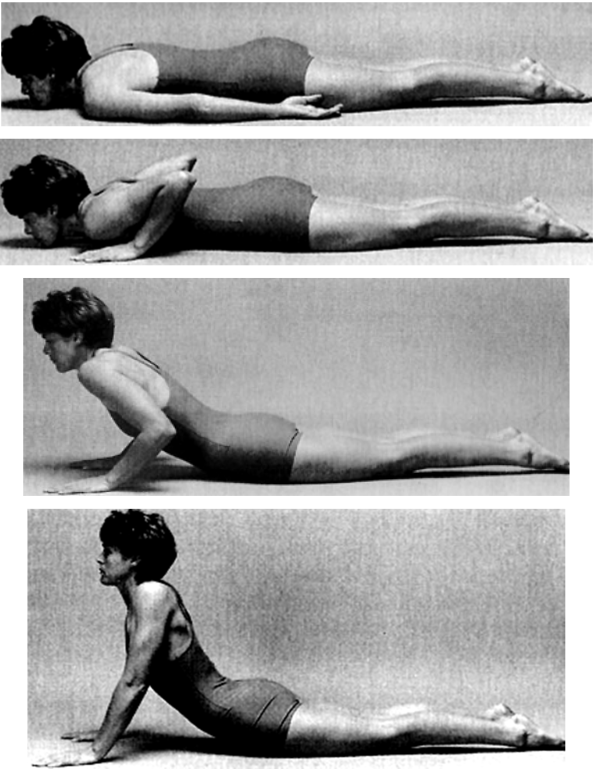
Bài tập 2: Nằm sấp và duỗi thân ở tư thế chống trên hai khuỷu tay
Bắt đầu từ tư thế nằm như bài tập 1, đặt 2 khuỷu tay bên dưới vai, rồi duỗi thân và chống trên 2 khuỷu tay, hít thở sâu
vài lần để cho các cơ vùng thắt lưng thư giãn hoàn toàn. Duy trì tư thế này trong 5 đến 10 phút hoặc lâu hơn nếu cảm
thấy dễ chịu. Mỗi ngày tập 3-6 lần.
Hình 2. Nằm sấp và duỗi thân ở tư thế chống trên hai khuỷu tay
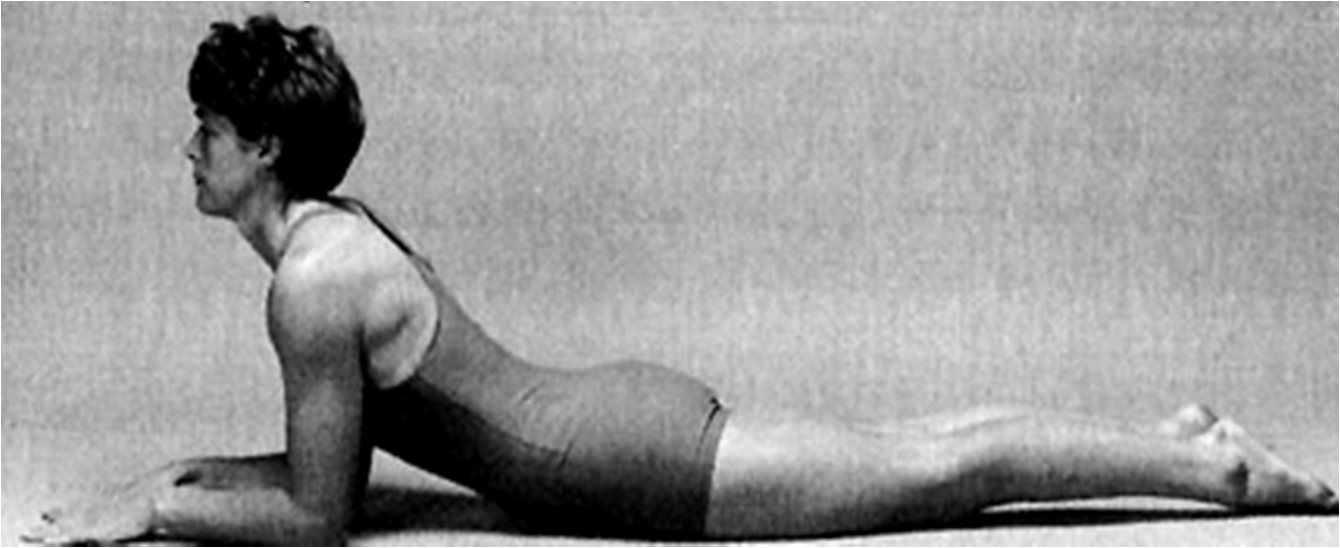
Bài tập 3: Duỗi thân ở tư thế nằm sấp chống trên hai bàn tay
Bắt đầu từ tư thế nằm sấp như bài tập 1, đặt 2 bàn tay dưới vai, dần dần dùng lực 2 tay để nâng thân mình lên trong giới
hạn đau chịu được tạo nên một sự võng thắt lưng, chú ý giữ cho khung chậu và cẳng chân áp sát trên sàn tập, duy trì tư
thế này trong 5 đến 10 phút (có thể dài hơn nếu bệnh nhân thấy dễ chịu, đau giảm, triệu chứng khu trú lại).
Lúc đầu cần thực hiện dần dần, sau đó nâng dần mức độ ưỡn thân mình về phía sau đến mức có thể được.
Mỗi lần tập, thực hiện bài tập này 10 lần, tập 3-6 lần trong ngày.
Hình 3. Duỗi thân ở tư thế nằm sấp chống trên hai bàn tay
Bài tập 4: Duỗi lưng ở tư thế đứng
Đứng thẳng với 2 chân dạng nhẹ, đặt bàn tay chống hông với các ngón tay hướng ra phía sau. Ưỡn thân về phía sau càng
nhiều càng tốt, chú ý giữ hai khớp gối thẳng khi làm động tác, giữ tư thế này trong 3 đến 10 phút trở lại tư thế
ban đầu.
Cứ sau mỗi lần thực hiện thì cố gắng ưỡn người ra sau thêm một ít nữa để đạt dần đến mức tối đa.
Hình 4. Duỗi lưng ở tư thế đứng
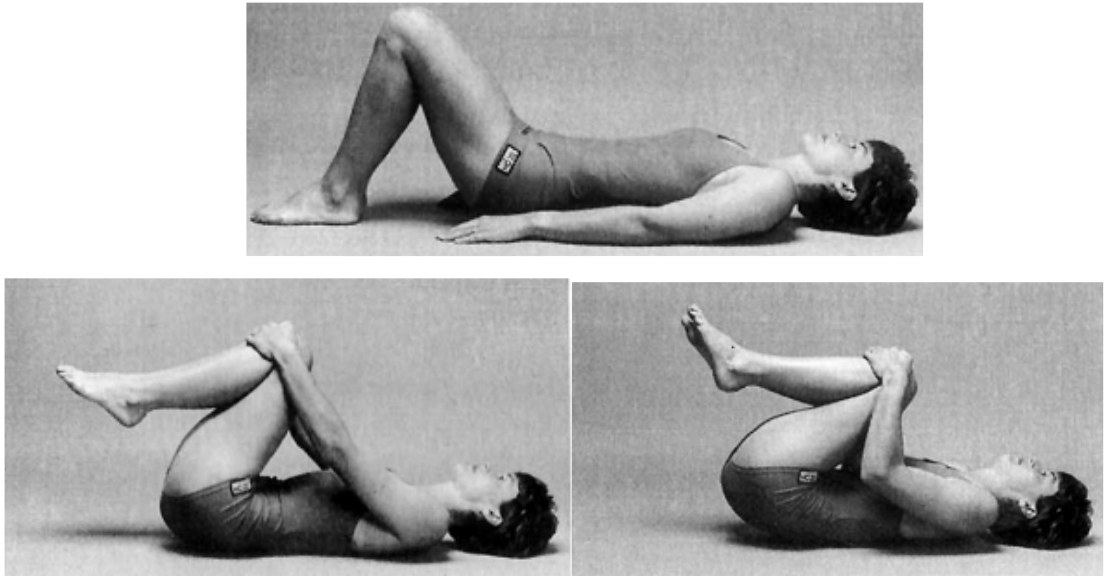
Bài tập 5: Gập 2 chân ở tư thế nằm
Bệnh nhân nằm ngửa với hai đầu gối gập, hai bàn chân đặt sát trên sàn nhà hay mặt giường. Tiến hành gập 2 gối về phía
ngực, dùng hai bàn tay ôm hai đầu gối và kéo đầu gối về phía ngực càng nhiều càng tốt. Sau mỗi động tác, cố gắng tăng
dần mức độ gập đến khi gối chạm đến ngực.
Trong khi làm chú ý không nâng đầu và không gập đầu vào thân, đồng thời không duỗi thẳng hai chân khi hạ thấp chân
xuống khi làm động tác. Bài tập này nhằm mục đích điều trị sự co cứng cơ ở vùng thắt lưng và sự giảm khả năng gập
cột sống. Nó nên được thực hiện thận trọng.
Trong một lần tập, thực hiện từ 5 hoặc 6 động tác này, mỗi ngày tập 3 đến 4 lần. Bài tập này làm giảm sự ưỡn cột
sống do đó sau khi làm bài tập này thì phải thực hiện ngay bài tập 3 ( để lấy lại độ ưỡn thắt lưng).
Hình 5. Gập 2 chân ở tư thế nằm
Bài tập 6: Gập lưng ở tư thế ngồi
Ngồi trên ghế với 2 chân dạng, 2 bàn tay đặt trên 2 đầu gối, gập thân về phía trước, 2 tay duỗi thẳng đến khi chạm nền nhà
thì quay về tư thế ban đầu. Thực hiện bài này, cứ sau mỗi lần lặp lại thì cố gắng gập thân thêm chút nữa đến khi đạt được
gập tối đa.
Bài tập này có thể thực hiện hiệu quả hơn bằng cách ngồi gập thân về trước, dùng 2 bàn tay nắm lấy 2 cổ chân, kéo thân
mình gập nhiều hơn.
Bài tập này nên áp dụng sau khi tập bài tập 5 một tuần mà hiệu quả, không gây đau. Lúc khởi đầu, mỗi lần tập chỉ nên tập
5 hoặc 6 lần, mỗi ngày tập 4 lần. Chú ý sau khi tập bài này phải thực hiện ngay bài tập 3.
Hình 6. Gập lưng ở tư thế ngồi
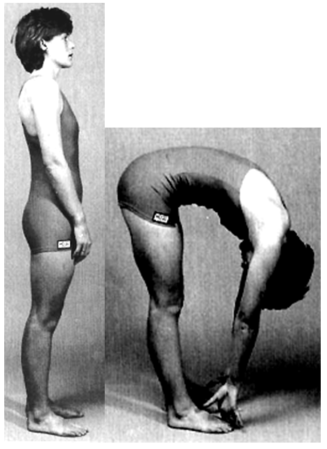
Bài tập 7: Gập thân ở tư thế đứng
Người bệnh đứng thẳng, hai bàn tay để dọc thân, hai chân dạng. Cúi gập thân về trước, các ngón tay càng tiến gần đến 2
bàn chân càng tốt, rồi trở về tư thế ban đầu.
Cứ sau mỗi lần tập bài này, cố gắng để gập thân càng nhiều càng tốt tiến đến mức tối đa.
Bài tập này thực hiện sau khi tập bài tập 6 hai tuần mà hiệu quả, không gây đau. Khởi đầu, mỗi lần tập thực hiện lặp
lại động tác 5 hoặc 6 lần. Mỗi ngày tập 1 đến 2 lần.
Sau khi kết thúc tập bài tập này phải thực hiện ngay bài tập 3. Trong thời gian 3 tháng kể từ khi hết đau, không thực
hiện bài tập này ở thời điểm 4 giờ đầu tiên trong ngày.
Chú ý:
Nguyên lý: Tập trung hóa điểm đau , đau tại lưng không lan
xuống chân.
Trong quá trình tập bệnh nhân tập một động tác hết đau mới
sang động tác tiếp theo, tập đau lan xuống chân thì ngưng tập.
![[1] Showcase trên Plasticity](/image/posts/2026-01-26-Hop-hut-am-cho-soi-nhua-PLA/1.jpg)
![[2] Hình ảnh sản phẩm](/image/posts/2026-01-26-Hop-hut-am-cho-soi-nhua-PLA/2.jpg)

![[1] Sơ đồ cơ bản](/image/posts/2026-01-07-Thiet-lap-wireguard-VPN/1.png)
![[2] Route 10.8.0.0/24 đến 192.168.1.2](/image/posts/2026-01-07-Thiet-lap-wireguard-VPN/2.png)
![[1] Ảnh ngang](/image/posts/2025-11-29-Tao-thumbnail-vuong-cho-anh-voi-ffmpeg/1.png)
![[2] Ảnh dọc](/image/posts/2025-11-29-Tao-thumbnail-vuong-cho-anh-voi-ffmpeg/2.png)
![[3] Sơ đồ](/image/posts/2025-11-29-Tao-thumbnail-vuong-cho-anh-voi-ffmpeg/3.png)